Gaming on Linux is very easy these days. You can install your OS, install Steam, install a game and hit "Play" and it should work. I use Ubuntu because I have been using it for so long and know both the distro and Gnome desktop well. I made this mostly for myself. This is not a comprehensive guide to setting up gaming on Linux. Maybe someone will find some part of this useful and help them. This small guide will not discuss the OS install and setup. You should be able to do that on your own. If you are new to Linux there are plenty of guides to help you get started. If you are running on a VM you are on your own. If you are on Ubuntu 25 or 26 things may be very different or not work at all. As with any Linux distro you can always check the version by running the shell command cat /etc/os-release.
More than anyone else, Valve has progressed the Linux gaming experience significantly. Both Nvidia and AMD have very good GPU drivers for Linux. This is especially true for AMD who contribute to the open source AMD driver directly. If you do not have a specific reason to get an Nvidia card, get an AMD GPU for use in Linux. Rasterization performance is very good for AMD GPUs. Ray tracing is better with Nvidia graphics cards. Frame rates are generally better without the Windows overheard and telemetry.
Be sure to run sudo apt update to check for updates to your install before starting stuff. The update command will retrieve the latest package info for you.
echo "$XDG_SESSION_TYPE"
Wayland and X11 are display managers. X11 is super old, like really really old. Wayland is newer but seemingly never finished. Wayland and x11 usage is determined by a setting in this file: /etc/gdm3/custom.conf. You need to restart the desktop for a change to this file to take effect. Ubuntu 24.04 defaults to x11. I think Ubuntu 25.10 “Questing Quokka” defaults to Wayland.
Enable Wayland:
set WaylandEnable=true in /etc/gdm3/custom.conf
or sudo sed -i s/WaylandEnable=false/WaylandEnable=true/g /etc/gdm3/custom.conf
sudo systemctl restart gdm3
Disable Wayland (switch to x11):
set WaylandEnable=false in /etc/gdm3/custom.conf
or sudo sed -i s/WaylandEnable=true/WaylandEnable=false/g /etc/gdm3/custom.conf
sudo systemctl restart gdm3
There is a native Linux client availlable in the App Center. It is suggested that if you use the snap version then you do everything with snaps and conversely if you use the .deb version you should use all other related software the same way whenever possible. I prefer the non-Snap package. Mostly because I hate snaps. Here are the system requirements.
curl -O https://cdn.fastly.steamstatic.com/client/installer/steam.deb
sudo apt install ./steam.deb or sudo dpkg -i ./steam.deb
Setup and login as normal.
This command is only for 24.04. global.compositor.backend.get_monitor_manager().experimental_hdr = 'on' Ubuntu 25 has made big improvements to HDR support.
There are several different drivers for Nvidia GPUs. I use the propritary version installed through the built-in Ubuntu driver management tool. ubuntu-drivers Follow these instructions https://documentation.ubuntu.com/server/how-to/graphics/install-nvidia-drivers/
If you really want the latest Nvidia driver and skip the stable release go here: https://www.nvidia.com/en-us/drivers/unix/ Help is here https://forums.developer.nvidia.com/c/gpu-graphics/linux/148
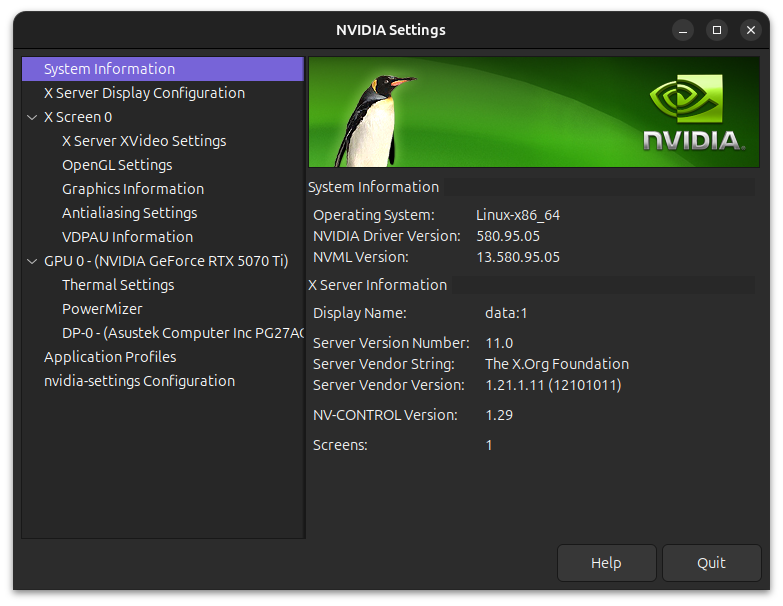
To see information about your driver you can run nvidia-settings. This will bring up the control panel.
or for a text output via a cli run nvidia-smi
+-----------------------------------------------------------------------------------------+
| NVIDIA-SMI 580.95.05              Driver Version: 580.95.05      CUDA Version: 13.0     |
+-----------------------------------------+------------------------+----------------------+
| GPU  Name                 Persistence-M | Bus-Id          Disp.A | Volatile Uncorr. ECC |
| Fan  Temp   Perf          Pwr:Usage/Cap |           Memory-Usage | GPU-Util  Compute M. |
|                                         |                        |               MIG M. |
|=========================================+========================+======================|
|   0  NVIDIA GeForce RTX 5070 Ti     Off |   00000000:07:00.0  On |                  N/A |
|  0%   42C    P8             17W /  300W |     604MiB /  16303MiB |      1%      Default |
|                                         |                        |                  N/A |
+-----------------------------------------+------------------------+----------------------+

+-----------------------------------------------------------------------------------------+
| Processes:                                                                              |
|  GPU   GI   CI              PID   Type   Process name                        GPU Memory |
|        ID   ID                                                               Usage      |
|=========================================================================================|
|    0   N/A  N/A            3279      G   /usr/lib/xorg/Xorg                      204MiB |
|    0   N/A  N/A            3471      G   /usr/bin/gnome-shell                    105MiB |
|    0   N/A  N/A            5052      G   /usr/bin/firefox                        172MiB |
|    0   N/A  N/A            6693      G   ...share/Steam/ubuntu12_32/steam          4MiB |
|    0   N/A  N/A            6872      G   ./steamwebhelper                         16MiB |
|    0   N/A  N/A            6910    C+G   ...am/ubuntu12_64/steamwebhelper          8MiB |
+-----------------------------------------------------------------------------------------+
Determining which video driver version is currently active is super annoying for Nvidia GPUs.
/sbin/modinfo nvidia | grep license
returns; which is not helpful.
license: Dual MIT/GPL
Running this command:
sudo lshw -class video | grep 'driver='
returns
configuration: depth=32 driver=nvidia latency=0 resolution=2560,1440
In this case the driver is using the proprietary version of the driver as indicated by nvidia. You can see which version are available by running
ubuntu-drivers --gpgpu list
Here is an abbreviated output.
nvidia-driver-580-open, (kernel modules provided by linux-modules-nvidia-580-open-generic-hwe-24.04)
nvidia-driver-580, (kernel modules provided by linux-modules-nvidia-580-generic-hwe-24.04)
nvidia-driver-580-server-open, (kernel modules provided by linux-modules-nvidia-580-server-open-generic-hwe-24.04)
nvidia-driver-580-server, (kernel modules provided by linux-modules-nvidia-580-server-generic-hwe-24.04)
Follow these instructions https://gist.github.com/russiantux/592b1267591c011bf765b14590774a5f Another guide https://github.com/ValveSoftware/gamescope?tab=readme-ov-file#building There is a Flatpak version but you will need everything else to be Flatpak as well like Steam. Gamescope is built into Ubuntu 25. I don't have any games that I need to use Gamescope to fix issues. You may need it to get HDR tonemapping working.
You don't need this but it is nice to have. It is like perfmon on windows. This is not available in an Ubuntu repository. Either install an image or compile it.
Snap https://snapcraft.io/mission-center Flatpak https://flathub.org/apps/io.missioncenter.MissionCenter App Image https://gitlab.com/mission-center-devs/mission-center/-/jobs/8004560208/artifacts/raw/MissionCenter-x86_64.AppImage Portable https://portable-linux-apps.github.io/apps/mission-center.html Home https://missioncenter.io/
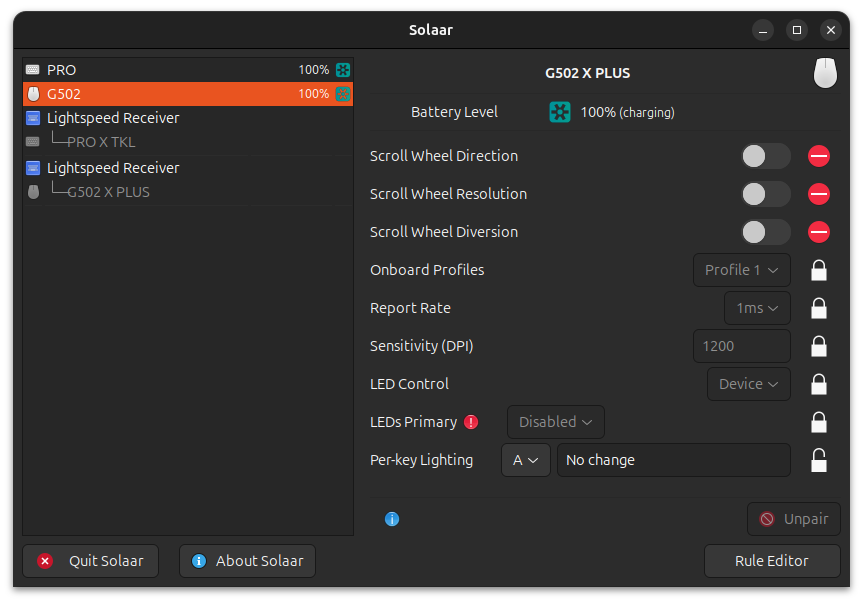
I have a Logitech keyboard and mouse. Need to control the lights and update the firmware. There is a PPA repo you can add to your setup and pull from there. https://launchpad.net/~solaar-unifying/+archive/ubuntu/stable This software detected both my Pro X TKL keyboard and my G502 X Plus mouse. There is a version of Solaar in the Snap store. This version is updated more frequently than the PPA .deb version. Solaar cannot update firmware. It also does not do a good job with macros. Logitech does not provide firmware outside of their proprietary Mac and Windows only software. Please provide polite feedback to Logitech, but otherwise know they hate you.
Another option might be Piper on top of libratbaq. Check to see if your hardware is supported. Your keyboard and mouse should work out of the box at a basic level.
If you have Razer devices go here. I don't have any. There is also OpenRGB for quite a few devices but I've never used it.
There is a .deb you can download from the official website. This will download a .deb file. You will need to manually install and update this. e.g. sudo dpkg -i ~/Downloads/discord-0.0.118.deb
You can also install a snap from the App Center. I have never tried the Snap version (have I mentioned that I'm not a fan of snaps). The usual annoyances presented by Discord and all the same privacy violations that exist for the Windows version of the app are all present on the Linux version as well. Be sure to add DNS tools like Pi-Hole or AdGuard to your network. Only the most aggressive block lists will block Discord related DNS queries so the light and moderate block lists will be safe to use.
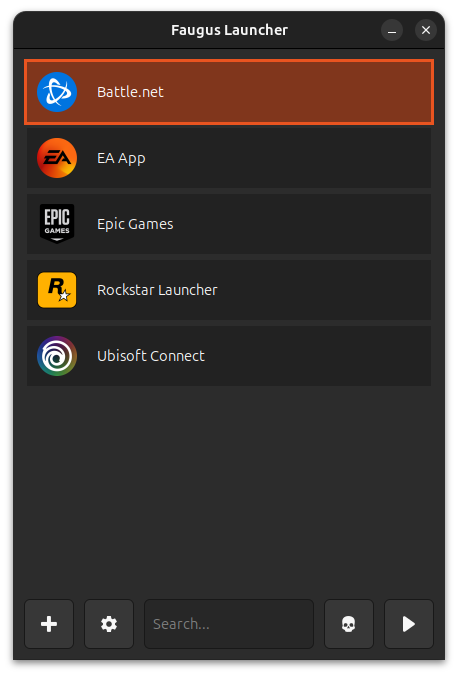
Lutris sucks now. It doesn't look like it is being updated any longer. Avoid. I like this one much better now. It is super minimal and works flawlessly. It uses UMU-Launcher.
sudo dpkg --add-architecture i386
sudo add-apt-repository -y ppa:faugus/faugus-launcher
sudo apt update
sudo apt install -y faugus-launcher
https://github.com/Faugus/faugus-launcher has all the instructions. There is a Debian repo you can add to you install and pull from there. I only tested this with the Battle.net client and Diablo 3 and Diablo 4 games and had no issues. I have EA App, EPIC Games Launcher, Rockstar Launcher, and Ubisoft Connect working without issue. Just follow the setup instructions for each app or game. Mostly don't login to the launcher the first time. Install, exit, then relaunch and then login.
If you have audio stuttering in a game try adding -PULSE_LATENCY_MSEC=60 as a launch option.
I have tried several. I'm not really happy with any of them. They have all been more work to setup and get working than it is worth. I suggest just copying your mods files to the appropriate game mods directory.
preempt=full
Simply copy paste the options above for the desired performance profile and add them to the GRUB_CMDLINE_LINUX_DEFAULT= line in /etc/default/grub (then run sudo update-grub to apply them at the next reboot).
- set the cpufreq governor to performance via:
/sys/devices/system/cpu/cpu*/cpufreq/scaling_governor
- disable proactive memory compaction:
echo 0 | sudo tee /proc/sys/vm/compaction_proactiveness
- disable kernel samepage merging
echo 0 | sudo tee /sys/kernel/mm/ksm/run
- trashing mitigation (prevent working set from getting evicted for 1000 millisec, this can help to mitigate stuttering behavior under memory pressure conditions):
echo 1000 | sudo tee /sys/kernel/mm/lru_gen/min_ttl_ms
- prevent stuttering behavior during intense I/O writes that may involve massive page cache flushing:
echo 5 | sudo tee /proc/sys/vm/dirty_ratio
echo 5 | sudo tee /proc/sys/vm/dirty_background_ratio
Read the full Ubuntu Dev Post
There are third party kernels. XanMod and Liquorix. Some people seem to like them. I found they made almost no difference in my bechmarking and they aren't worth the hassle.
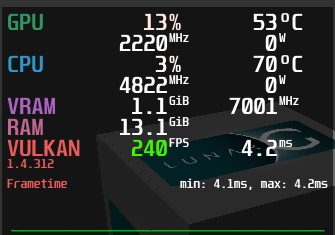
A Vulkan and OpenGL overlay for monitoring FPS, temperatures, CPU/GPU load and more. Details. MangoHud is awesome and powerful. It can sometimes cause issues and might be overkill for what you need. The default built-in Steam FPS counter might be all you need. I don't know how accurate these frame counters are if you are doing benchmarking of games.
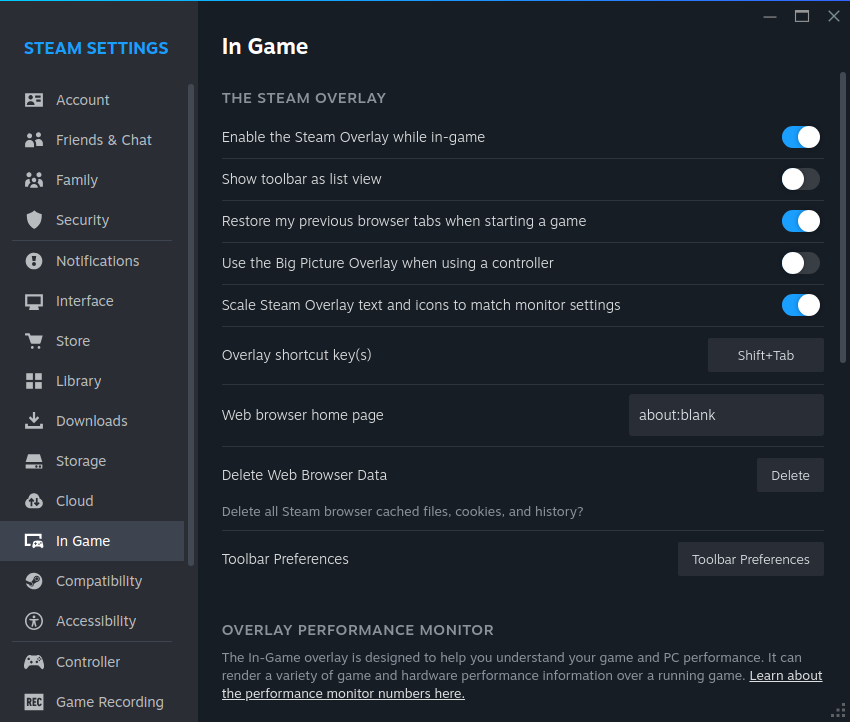
To install the Steam performance monitor open the menu and select Steam then select Settings and then go to In Game and check the box Enable Steam Overlay while in-game.
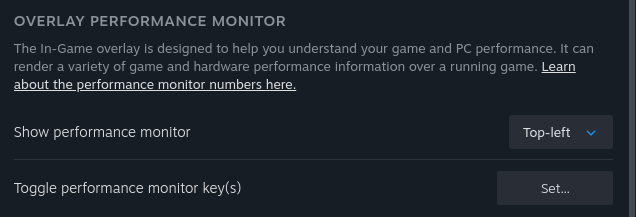
Then scroll down to Show performance monitor. and choose the location to show the FPS counter.
There is a Steam support article that has more information and describes the details that can be enabled. The Steam frame counter has become quite powerful.

You might want something more powerful especially if you are benchmarking games. To install MangoHud:
sudo apt install mangohud
In your game launch options in Steam add mangohud %command% To make MangoHud automatically launch with all Vulkan games, it is possible to set the following environment variable:
MANGOHUD=1
I had problems loading a customized config file in Baldur's Gate 3 in Steam. I protected the path with double quotes and it worked. Launch option looks like this:
MANGOHUD_CONFIGFILE="/home/jason/.config/MangoHud/bg3.conf" mangohud %command%
I wanted nothing but the FPS counter. No background no extra text. Add fps_only and set background_alpha=0.0
background_alpha=0.0
background_color=000000
font_size=14
text_color=FFFFFF
position=top-left
fps_only
fps_color_change
fps_color=B22222,FDFD09,39F900
fps_value=30,60
There is a useful piece of software to generate Mangohud config files. It is called goverlay. You can find a .deb version in the official repos. It is very old. The Ubuntu install instructions are messed up, adjust accordingly. There is a dependency you need that is not in an official Ubuntu repo libqt6pas6. One of the dependencies is something called pascube. I couldn't figure out how to install this or compile it so there is a warning in the gui about it missing. goverlay still works fine without it. There is also an app image for this software. Here is what I did:
sudo apt install zypper
sudo apt-get update
wget https://github.com/davidbannon/libqt6pas/releases/download/v6.2.8/libqt6pas6_6.2.8-1_amd64.deb
sudo apt install ./libqt6pas6_6.2.8-1_amd64.deb
wget https://github.com/benjamimgois/goverlay/releases/download/v1.5.2/goverlay_1_5_2.tar.xz
xz --decompress ./goverlay_1_5_2.tar.xz
./goverlay_1_5_2/goverlay
sudo ln -s ~/Downloads/goverlay_1_5_2/goverlay /usr/bin/goverlay
goverlay writes to ~/.config/MangoHud/MangoHud.conf by default.
Snaps, flatpaks and log files can easily get out of control and use up disk space. Logs can fill up disk space easily if something goes haywire and starts writing to a log file like /var/log/syslog. Snaps default to keeping 3 versions. Newer versions of snaps do not start until you restart the software. This is one reason I avoid snaps. They are a pain to maintain. I can't avoid systemd any more but that is a rant for another time.
You can find the biggest log files in the /var/log directory structure. You need to use sudo command as most of these files have limited permissions:
sudo du -chx /var/log/ | sort -hr | head -n 25
Journald log files will likely be large. Journald is part of systemd. You can quickly cleanup the disk usage of journald using journalctl. This is not a permanent setting. To see how much disk space journald is using:
journalctl --disk-usage
To reduce current disk usage of journald to 100 megabytes do the following:
journalctl --vacuum-size=100M
To limit the amount of disk used by journalctl edit /etc/systemd/journald.conf and then restart journald. There is a super fancy command for seeing this config file 'systemd-analyze cat-config systemd/journald.conf'. You can restart journald with systemctl restart systemd-journald and the changes will take affect. I recommend you limit journald disk usage.
[Journal]
SystemMaxUse=256M    # Maximum total journal size
RuntimeMaxUse=128M   # Maximum journal size in use temporary storage
MaxFileSec=1month    # Maximum amount of time to retain log files
To list what snaps are installed. The last column is Notes. Older versions not in use will have the word "disabled" in this column.
snap list --all
To see how much disk space is being used by snaps:
du -hcs /var/lib/snapd/snaps/*
We can then look for this word. List all installed snap old versions and the version numbers:
snap list --all | awk '/disabled/{print $1, $3}'
You can remove a specific version of snap installed:
snap remove --revision=
A nice little bash script from Stack Overflow to remove older versions.
#!/bin/bash
# Removes old revisions of snaps
# CLOSE ALL SNAPS BEFORE RUNNING THIS
set -eu

snapsToRemove=$(LANG=en_US.UTF-8 snap list --all | awk '/disabled/{print $1, $2, $3}')

while read snapname version revision; do
    if [[ "$revision" == *[a-zA-z]* ]]; then
        # Version field is empty. Revision is in second field
        revision=$version
    fi
        snap remove "$snapname" --revision="$revision"
done <<< $snapsToRemove
The version of snapd in Ubuntu 24.04, retains 3 versions by default. You can set the maximum number of snap revisions retained for each package by setting the refresh.retain option=. The minimum is two. The maxiumum is twenty (I think).
sudo snap set system refresh.retain=2
/var/lib/flatpak/repo is the default path where flatpaks are installed. When a flatpak is upgraded there is not a cleanup process. For --user installed packages the install location is ~/.local/share/flatpak/. To see usage in these two paths:
du -chs /var/lib/flatpak/repo ~/.local/share/flatpak/
The flatpak uninstall --unused command removes both the system and user runtimes that are no longer needed. To clean this mess up.
flatpak uninstall --unused
sudo apt autoremove