The workflow consists of three major components:
- A Cloudflare Worker to host the pages
- A custom roam component to trigger the publishing and the unpublishing
- Some JavaScript to handle the publishing and unpublishing
- Optional: set up a smartblock
Please note: you are doing everything at your own risk! If you don't have a basic understanding of how roam/js works and know basic javascript, please don't use this!
This worker stores the pages in a key-value store. The full documentation can be found here
For a general tutorial on how to use workers, see https://developers.cloudflare.com/workers/learning/getting-started
Get started:
- Check the tutorial on how tutorial on how to install the cli, authenticate and create a worker
- Instructions on how to set up the key-value namespace can be found here https://developers.cloudflare.com/workers/cli-wrangler/commands#kv
At the end your config file wrangler.toml should look something like this:
name = "roam-to-web"
type = "javascript"
account_id = "xxxxxxxxxxxxxxxxxxxxxxxxxxxxxxxx"
workers_dev = true
route = ""
zone_id = ""
kv_namespaces = [
  { binding = "ROAM_PAGES_KV", preview_id = "xxxxxxxxxxxxxxxxxxxxxxxxxxxxxxxx", id = "xxxxxxxxxxxxxxxxxxxxxxxxxxxxxxxx" }
]
Now think of some kind of secret and add it to the wrangler.toml file like this
name = "roam-to-web"
type = "javascript"
account_id = "xxxxxxxxxxxxxxxxxxxxxxxxxxxxxxxx"
workers_dev = true
route = ""
zone_id = ""
kv_namespaces = [
  { binding = "ROAM_PAGES_KV", preview_id = "xxxxxxxxxxxxxxxxxxxxxxxxxxxxxxxx", id = "xxxxxxxxxxxxxxxxxxxxxxxxxxxxxxxx" }
]
vars = { secret = "your_secret_here" }
The worker code is pretty straight forward; you handle the request:
GETreturns the html of the roam-part you published wrapped in a body element with some css linkedPOSTupdates the key-value with the body of the requestDELETEremoves the key from the storeOPTIONSis for the cors preflight
you can see the entire code here:
addEventListener('fetch', (event) => {
  event.respondWith(handleRequest(event.request))
})

const init = {
  headers: {
    'Access-Control-Allow-Origin': 'https://roamresearch.com',
    'Access-Control-Allow-Methods': 'GET,HEAD,POST,OPTIONS,DELETE',
    'Access-Control-Allow-Headers': 'X-Secret',
    'content-type': 'text/html;charset=UTF-8',
  },
}

/**
 * Respond with hello worker text
 * @param {Request} request
 */
async function handleRequest(request) {
  console.log(request)
  const req_secret = request.headers.get('x-secret')
  const url = new URL(request.url)
  const path = url.pathname.replace('.html', '')
  console.log(request.method + ' ' + path)

  if (request.method === 'GET') {
    const value = await ROAM_PAGES_KV.get(path)
    if (value === null) {
      return new Response('Value not found', {
        ...init,
        status: 404,
      })
    }
    return new Response(
      `<!DOCTYPE html>
      <html lang="en">
      <head>
        <meta charset="UTF-8">
        <meta name="viewport" content="width=device-width, initial-scale=1.0">
        <title>Document</title>
        <link rel="stylesheet" href="https://obvious-happy-guan.glitch.me/style.css">
      </head>
      <body>
        ${value}
      </body>
      </html>`,
      init,
    )
  } else if (request.method === 'POST') {
    if (req_secret === secret) {
      const page = await request.text()
      await ROAM_PAGES_KV.put(path, page)
      return new Response(path, init)
    } else {
      return new Response('', { ...init, status: 401 })
    }
  } else if (request.method === 'OPTIONS') {
    return new Response(request, init)
  } else if (request.method === 'DELETE') {
    if (req_secret === secret) {
      await ROAM_PAGES_KV.delete(path)
      return new Response(path, init)
    } else {
      return new Response('', { ...init, status: 401 })
    }
  }
  return new Response('', { status: 405 })
}
Under https://obvious-happy-guan.glitch.me/style.css I have hosted some basic css, you can modify this part as you want,
Now it is time to publish the worker (using wrangler publish)
first make sure that you have custom components activated
create a clojure-code-block somewhere in your roam-graph and paste the following code
Cloudflare Publish
(def cfpublish (. js/window -cfpublish))
(def cfunpublish (. js/window -cfunpublish))
(def cfopen (. js/window -cfopen))
(def wind (. js/console -log))


(defn mycomp [_]
  [:div {:class "cf-container bp3-button-group"}
   [:button {:on-click (fn [e] (cfpublish e))
             :class "cf cf-publish bp3-button bp3-icon-arrow-up "}
    "publish"]
   [:button {:on-click (fn [e] (cfopen e))
             :class "cf cf-open bp3-button bp3-icon-document-open"}
    "open"]
   [:button {:on-click (fn [e] (cfunpublish e))
             :class "cf cf-unpublish bp3-button bp3-icon-delete"}
    "unpublish"]
   ]
)Create a roam/js environment like this:
const cf_secret = "your_secret_here"
const cf_url = "https://worker-url.your-name.workers.dev"

window.cfpublish = (e) => {
  const roam_block = e.target.closest(".roam-block")
  const publish_route = roam_block.querySelector("code").innerText;
  const html = roam_block.closest(".rm-block-main").nextElementSibling.innerHTML

  const mHeaders = new Headers({
    'Content-Type': 'text/plain',
    'X-Secret': cf_secret,
  });
  const myRequest = new Request(`${cf_url}/${publish_route}`, {
    method: 'POST',
    headers: mHeaders,
    body: html
  });

  fetch(myRequest).then(res => console.log(res))
}

window.cfunpublish = (e) => {
  const roam_block = e.target.closest(".roam-block")
  const publish_route = roam_block.querySelector("code").innerText;

  const mHeaders = new Headers({
    'Content-Type': 'text/plain',
    'X-Secret': cf_secret,
  });
  const myRequest = new Request(`${cf_url}/${publish_route}`, {
    method: 'DELETE',
    headers: mHeaders
  });

  fetch(myRequest).then(res => console.log(res))
}

function cf_open(e) {
  const target = e.target
  const publish_route = target.closest(".roam-block").querySelector("code").innerText;
  var win = window.open(`${cf_url}/${publish_route}`, '_blank');
  win.focus();
}


window.cfopen = cf_open
replace the secret in line 1 with your secret from above and the url in line 2 with the url your worker is running at.
Now you are set; you can use the custom component you created above to publish pages directly from your roam graph.
Create a roam/render component, link the clojure-script block, and add a inline-code (using backticks); where you define the path of the page.
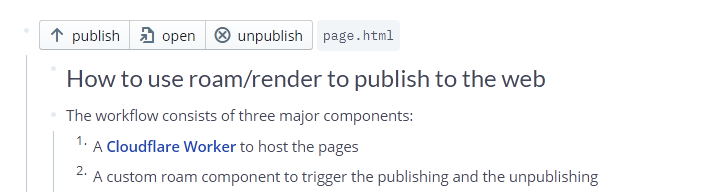
- The block should look like this:

The component takes the entire html in the children below and publishes it...
This page was build using the methods mentioned above; it looks like this in my Roam-graph
assuming you are lazy, or just can't remember the block-ref of the clojure-script, it might be helpful to set up a smartblock, something like:
- {{roam/render: ((h9a3BHOBp))}}
<%INPUT:path of your page%>
And the screenshot:

If you have any questions, feel free to ask me on twitter https://twitter.com/jonathanvoelkle or on the roam-slack
Demo here https://roam-to-web.jonathanvoelkle.workers.dev/roam-to-web-instructions